Compiling C/C++ : Notes/Tips
When it comes to performance, C and C++ even today are unbeatable. They are compiled languages and a code written in C or C++needs to be compiled for a given platform with its platform-specific tools, this process or compiling for a given platform is called cross-compilation. As a developer, it is not sufficient to know the syntax and semantics of this beautiful language but one must also know what goes in compilation and how it’s been done.
There are various vendors who provide C/C++ compilers and various tools. In this article, we will go through the compilation process, some important tools, their usage and some debugging tricks.
A typical C/C++ typical project would have two types of files:
- Header files (with file name extension as
.h/.hxx/.hpp) and - Source files (with file name extension as
.c/.cxx/.cpp/.cc).
C and C++ are two different languages and hence avoid mixing them but if a project demands, the usually the thumb of rule is to name C file extension as .h and .c whereas for C++ .hpp and .cpp
Let us start with a snippet of C++ code with file name hello_cpp.cpp:
#include <iostream>

int main(int argc, char* argv[])
{
    std::cout << "Hello C Plus Plus!" << std::endl;
    return 0;
}
My build platform is Darwin (Apple MacOS)
$ uname -srmp
Darwin 17.7.0 x86_64 i386
Using g++ Compiler:
$ g++ --version
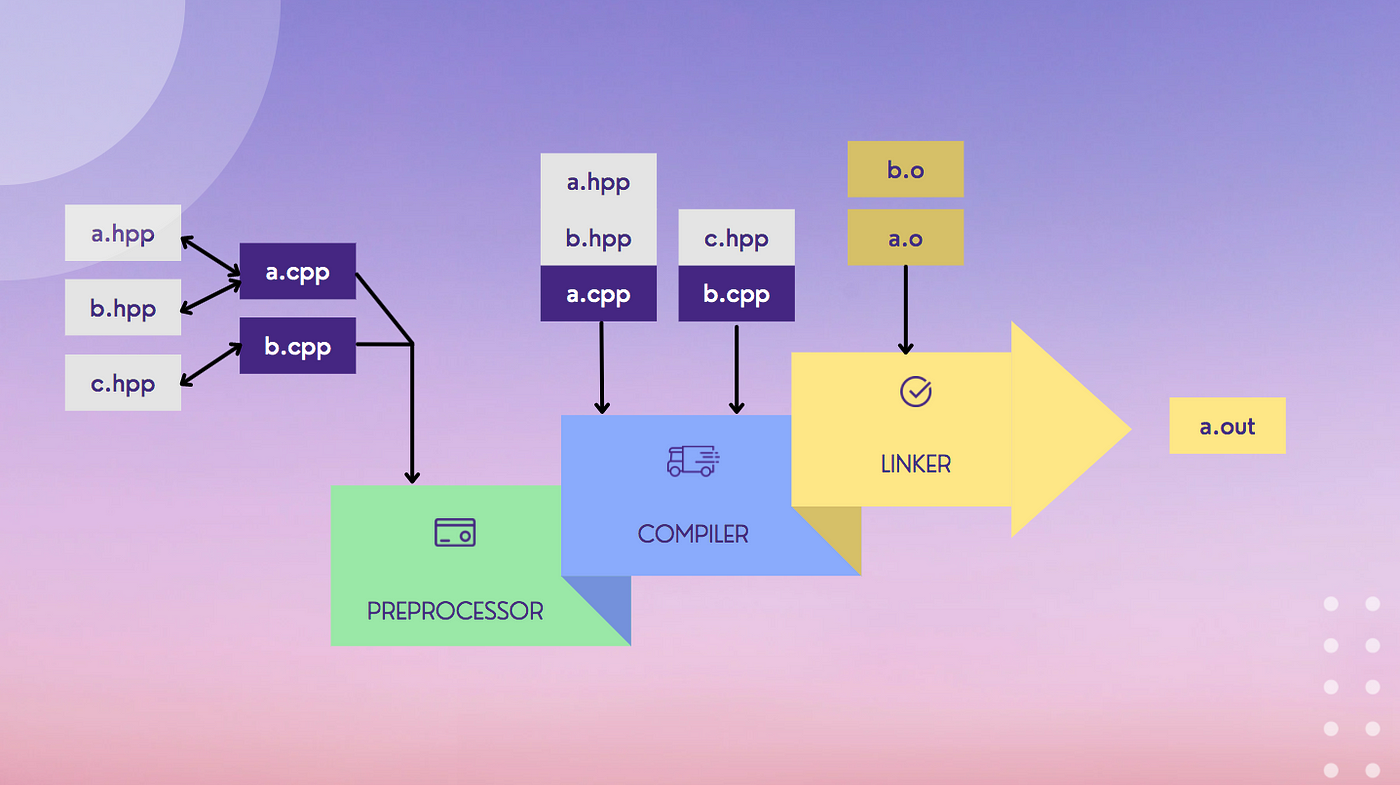
Apple LLVM version 10.0.0 (clang-1000.11.45.5)Stages: Preprocessor, Compile, linking
All source files are converted to object files, object files follow ELF format for Linux and macOS platforms.
In a project, a deliverable can be an executable program or a library. Libraries can be either Static (.a) or Dynamically (.so) linked. Later we will see how we can generate these respective outputs with compile options.
But first, let us create preprocessor file:
For each C++ source file, the preprocessor will build a translation unit by inserting content in it when it finds an # include directive, macro replacements, conditional compilations. This is the best time to find duplicate symbols OR if you would like to override a specific symbol with your own implementation.
To obtain that translation unit (the preprocessed source code), the -E the option can be passed to the g++ compiler.
$ g++ -E hello_cpp.cpp -o hello_cpp.ppOnce the preprocessor finishes creating that (sometimes huge) translation unit, the compiler starts the compilation phase and produces the object file.
$ wc -l hello_cpp.pp
   40845 hello_cpp.pp
Next, compile the file with -c option, without linking the project.
$ g++ -c hello_cpp.cpp
$ file hello_cpp.o
hello_cpp.o: Mach-O 64-bit object x86_64
You will notice that I generate a file hello_cpp.o that is an object file without linkage associated with it.
Finally, Linking the file to that we can execute it.
$ g++ hello_cpp.cpp -o hello_cpp.out
$ hello_cpp.out
Hello C Plus Plus!
Include Paths & Linking Libraries(3rd Party)
In a project, you may have header files coming from are various places:
- Your own creation,
- System files,
- Integrating with 3rd party packages or code, etc.
Our task is to include the path such that the compiler finds them. At this point the most important tip:
Often, people overlook a small but very important point and end up in a long debugging cycle.
TIP 1 :- Include files version and the generated libraries version has to be the same.
TIP 2:- Also make sure the libraries are compiled for the intended platform that you are compiling for. This is quite easy to check, just run file the command followed by the library name.
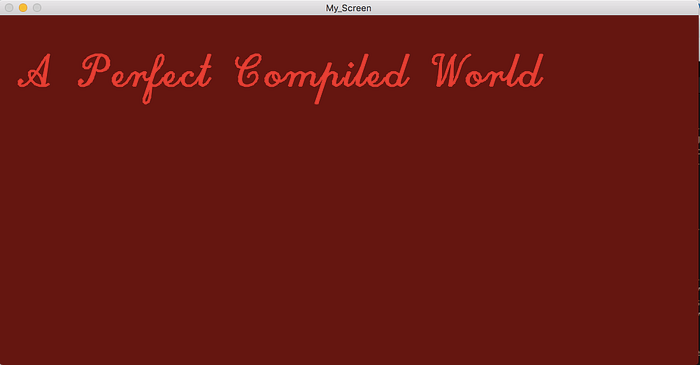
Let us take an example, calling OpenCV APIs to render text on an image. File is named as hello_cv.cpp
#include <iostream>
#include "opencv2/highgui/highgui.hpp"
#include <opencv2/imgproc.hpp>int main(int argc, char* argv[])
{
    /* Create an empty image*/
    cv::Mat img(500, 1000, CV_8UC3, cv::Scalar(0,0, 100));    if (img.empty())
    {
        std::cout << "\n Image is empty, something gone wrong.\n";
        return -1;
    }    cv::namedWindow("My_Screen", CV_WINDOW_AUTOSIZE);    cv::Point org(30, 100);
    cv::putText(img, "A Perfect Compiled World", org,
           cv::FONT_HERSHEY_SCRIPT_COMPLEX, 2.1,
           cv::Scalar(0, 0, 255), 2, cv::LINE_AA);

    cv::imshow("My_Screen", img);
    cv::waitKey(0);
    cv::destroyWindow("My_Screen");    return 0;
}
Before we compile our little program let us get familiar with a tiny little utility called pkg-config. It's a helper tool to find the correct installed path for libraries and their respective header files along with the compilation option, mind the world installed, on your system. This is not always the case, hence another caution and be mindful of this fact.
$ pkg-config --cflags opencv
-I/usr/local/include/opencv -I/usr/local/include
The beauty is pkg-config added -I option too. This flag informs the directory path to the compiler, where it can find the header files. And similarly, -L the option below informs the compiler the path where all the libraries can be found.
$ pkg-config --libs opencv
-L/usr/local/lib -lopencv_ml -lopencv_bioinspired -lopencv_dnn_objdetect -lopencv_highgui -lopencv_videoio -lopencv_imgcodecs -lopencv_freetype -lopencv_fuzzy -lopencv_hfs -lopencv_img_hash -lopencv_line_descriptor -lopencv_phase_unwrapping -lopencv_reg -lopencv_tracking -lopencv_dnn -lopencv_video -lopencv_plot -lopencv_xphoto -lopencv_imgproc -lopencv_core
Now, let us compile our code with OpenCV:
$ g++ `pkg-config --cflags --libs opencv` hello_cv.cpp -o hello_cv
$ ./hello_cvv
You must see the following screen:
Static Library Files
When several .o files are achieved into one with an extension, .a is called a static library. Yes, it's just about archiving all object files into one.
In Linux/MacOS these static libraries have a .a extension, whereas in Windows, they exist with .lib extension. Another tool ar is being used to create static library :
# Just an example$ ar -cvq libmyproj.a myproj_file1.o myproj_file2.o myproj_file3.o
Shared Objects (Dynamic) Library Files
Since they are shared, different programs can make external references to them. They are not getting added to the program code size but rather at run time the program makes calls to references to invoke. If the references are not found, you might get a “Symbol not found” error.
- On Linux, these libraries are called shared objects with extension
.so. - On MacOS, they have a
.dylibextension. - On Windows they are called dynamic libraries with extension as
.dll.
On Linux, the shared objects are created using following command:
$ g++ -shared -Wl,-soname,libhellocv.so `pkg-config --cflags --libs opencv` hello_cv.cppOn MacOS,
$ g++ -shared `pkg-config --cflags --libs opencv` hello_cv.cpp-o libhellocv.dylibThere are various advantages of having shared objects, can you name a few?
What if the libraries are in different folders?
Let us say you have a library libfoo.so at /path/to/other/library/libfoo.so, outside of system path (i.e. LD_LIBRARY_PATH).
You can specify the folder that contains it like -L/path/to/other/libraryand then the short form -lfoo to mention the library name. As you see the actual name of the library is libfoos.so but you can skip the preamble lib and similarly .so and just mention -lfoo.
Debugging : Useful Tools
Production Vs Debug : Developers add a lot of debugging code and often it is not required in the production build. How to control this behavior using compile time?
Using NDEBUG macro during compile option would enable or disable the debug code. As follows:
#include <iostream>
#include "opencv2/highgui/highgui.hpp"
#include <opencv2/imgproc.hpp>int main(int argc, char* argv[])
{
    /* Create an empty image*/
    cv::Mat img(500, 1000, CV_8UC3, cv::Scalar(0,0, 100));    if (img.empty())
    {
       std::cout << "\n Image is empty, something gone wrong.\n";
       return -1;
    }    cv::namedWindow("My_Screen", CV_WINDOW_AUTOSIZE);    cv::Point org(30, 100);#ifdef NDEBUG
    cv::putText(img, "RELEASE Build", org,
           cv::FONT_HERSHEY_SCRIPT_COMPLEX, 2.1,
           cv::Scalar(0, 0, 255), 2, cv::LINE_AA);
 #else
    cv::putText(img, "DEBUG Build", org,
           cv::FONT_HERSHEY_SCRIPT_COMPLEX, 2.1,
           cv::Scalar(0, 0, 255), 2, cv::LINE_AA);
 #endif
    cv::imshow("My_Screen", img);
    cv::waitKey(0);
    cv::destroyWindow("My_Screen");    return 0;
}
Compile the code but just till preprocessor stage and verify the code inclusion?
Now, full compile with and without NDEBUG as below to see the difference:
$ g++ -DNDEBUG `pkg-config --cflags --libs opencv` hello_cv.cpp -o hello_cvNDEBUG is system know compilation flag but you can define your own flags too and user -D compile option to control them.
“Undefined Symbol” :
- There are various tools but the most I love is
nmwithgrepcan give you the best results.
With nm, you can see the symbol’s name list. Familiarize yourself with the meaning of the symbol types:
T(Text section symbol)U(undefined — useful for thoseundefined symbolerror)I(indirect symbol)
If a symbol is local (non-external) the symbol type is presented in lowercase letters, for example a lowercase u represents an undefined reference to a private external in another module in the same library.
You can also use objdump and readelf on Linux. MacOS has otool quite similar to readelf.
Magic strings command:
At times, you want to quickly search a string in the library or in an executable. This could be for various reasons, for example searching for the minor/major version number, a specific string that suggests a valid build, etc. You can achieve this by using:
$ string -a hello_cv | grep <your search string>Removing debug symbols :
strip is another magic command that can reduce the library or executable size drastically. Usually, the production builds must have debug symbols stripped.
Generating and Analysing Code Dump file:
In case you would like me to add more tools that i missed out, send me on tomdeore@gmail.com.

